

Product Description
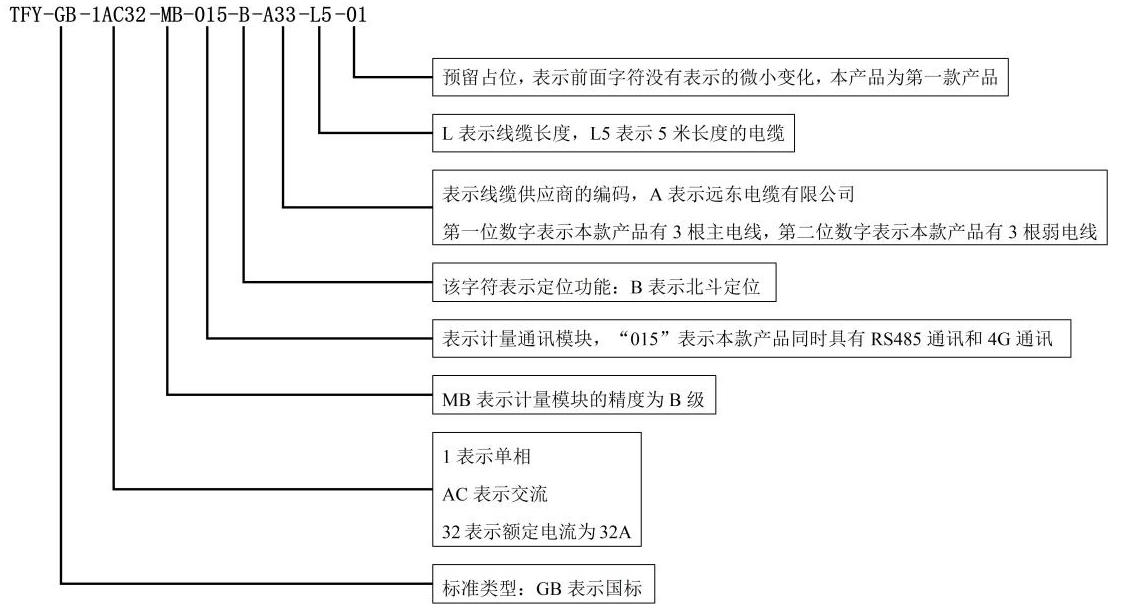
1 Smart AC Charging Plug Model
2 Technical Specifications
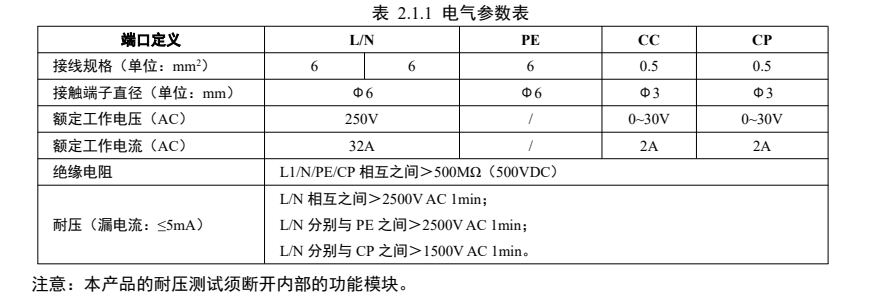
2.1 Electrical Parameters
2.2 Built-in Single-Phase AC Metering Module
2.2.1 Gun-head metering, replacing the in-pile metering module.
2.2.2 Measurement Module Performance Parameters

Active Energy Meters (Class A, Class B, Class C, Class D, and Class E)
2.2.3 Methods for Verification and Calibration
Perform verification and calibration according to JJG 596-2012, the Verification Regulation for Electronic AC Energy Meters. The detachable feature allows the meter to be easily separated from the charging pile, facilitating on-site metrological inspections as well as verification in a metrology laboratory.
2.2.4 Static Power Consumption: ≤0.6W, 10VA.
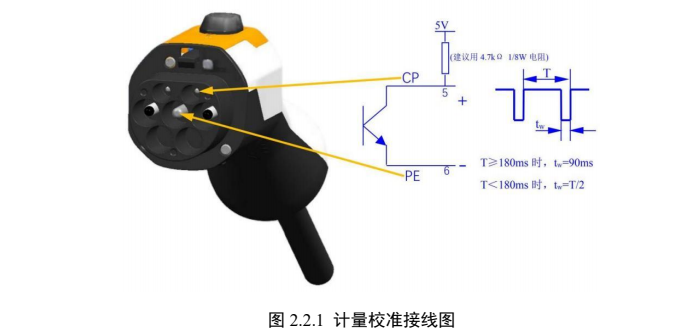
2.2.5 Meter Calibration: Electrical Energy Pulse Method, as shown in Figure 1.
2.3 Mechanical Performance Parameters
Plug-and-play lifespan: ≥10,000 cycles
Mechanical insertion/extraction force: ≤100N
2.4 Environmental Performance Parameters
Protection rating: IP54 (before mating)
IP55 (when mated)
IP66 (Internal Cavity)
Operating temperature range: -40°C to +70°C
2.5 Materials
Shell: PC+SI
L/N Terminal: Copper, with silver-plated surface
PE/C/CC Terminal: Copper, with silver-plated surface
Seals: Rubber components
Flame-retardant rating of the insulation material: UL94 V-0
2.6 Communication Function (Optional)
The charging gun comes with built-in RS485 communication, enabling it to transmit parameters such as electric energy and temperature to the charging pile control module.
The charging gun comes equipped with 4G communication, enabling it to remotely transmit parameters such as power and temperature to the charging pile management platform.
The charging station comes equipped with BDS/GPS positioning functionality, enabling it to transmit the location information of both the charging gun and the station itself to the charging station management platform.
2.7 Detachable Functionality
Safety Warning: Before performing any disassembly operations, ensure the equipment is completely de-energized and disconnected from all power sources or loads.
Attention: This disassembly operation should be performed by qualified or trained professionals only.
Illustration note: The diagrams included in this document illustrate the key steps of the process; for detailed structural specifics, please refer to the actual product.
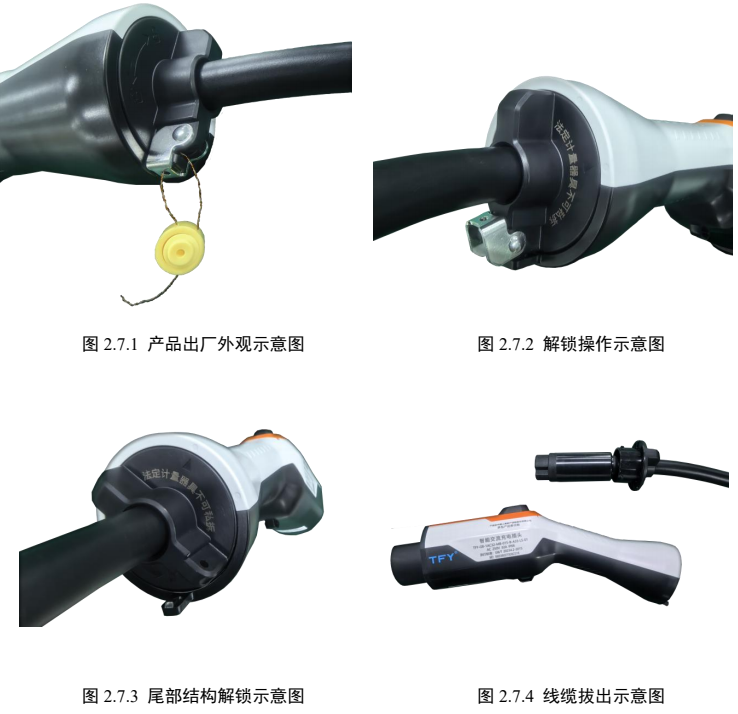
Step 1: Confirm that the product is in its original factory condition, verify that the exterior and lead seals are intact with no signs of tampering, refer to Figure 2.7.1.
Step 2: Cut off the lead seal located at the bottom of the product, then lift the latch upward, referring to Figure 2.7.2.
Step 3: Rotate the tail knob counterclockwise until it reaches the rotational limit position, thereby completing the unlocking of the tail structure. Refer to Figure 2.7.3.
Step 4: Remove the tail knob, hold the cable, and gently apply even pressure along the connector’s axis to pull the cable and cable connector out from inside the product.
Remove it from the corresponding socket—this completes the entire process of disassembling the charging gun; refer to Figure 2.7.4.
2.8 Seal
At the connection point between the charging gun's tail end and the cable, there is a structure designed for sealing by metrology regulatory authorities.
2.9 Standards and Specifications
GB/T 20234.1-2023 Electric Vehicle Conductive Charging Connector – Part 1: General Requirements
GB/T 20234.2-2015 Electric Vehicle Conductive Charging Connector – Part 2: AC Charging Interface
3 Electrical Principles
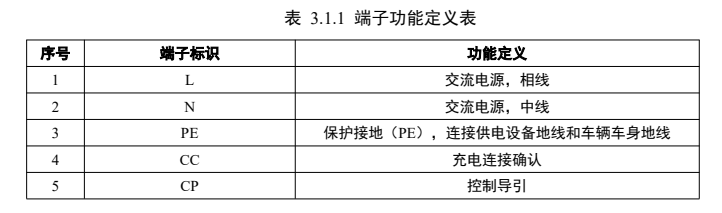
3.1 Definition of the Gun-Head Terminal Function
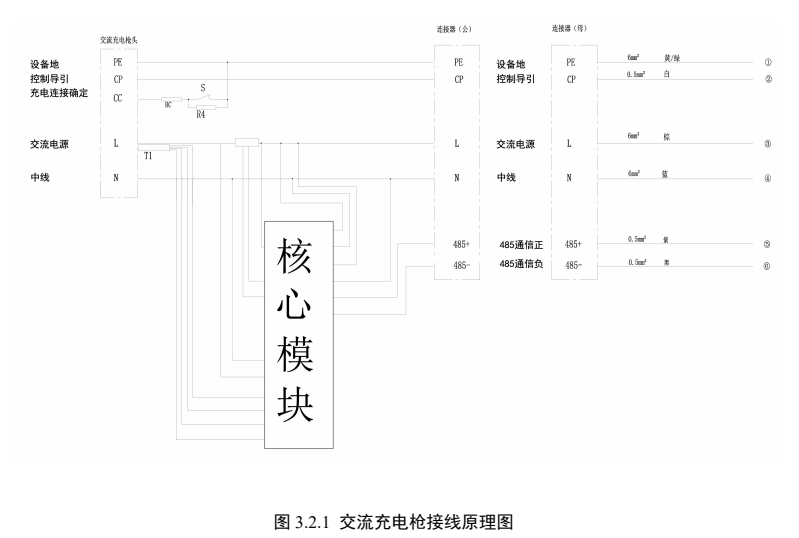
3.2 Wiring Diagram
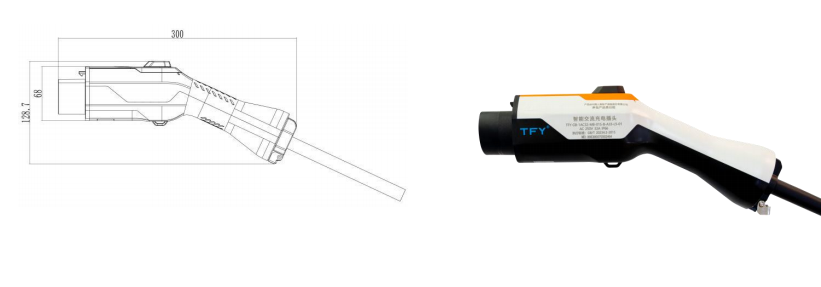
4 Outline Dimension Drawing
5 Usage Precautions
To ensure charging safety and proper device operation, please strictly follow the following operating guidelines:
1. Absolutely no live plugging or unplugging is allowed.
When connecting or disconnecting the charging cable harness, ensure that the device is powered off to prevent short circuits or electric shock risks caused by operating on live circuits.
2. Properly unlock and separate the charging plug
When separating the charging plug from the socket, fully depress the release button all the way down and pull it straight out in one motion. Avoid swaying left or right or yanking forcefully, as this could cause the connector to jam or become damaged.
3. Keep it inserted vertically, avoiding any tilting or shaking.
When inserting the charging gun, make sure to align it vertically and apply firm pressure to avoid deforming the internal pins or causing poor contact if the connector is shaken side to side.
4. Ensure the charging cable is naturally straight and untangled.
During the charging process, the cable should be neatly arranged to avoid twisting, bending, or being pulled by external forces, preventing damage to the charging gun holder due to excessive stress.
5. Immediately stop charging if an unusual odor is detected.
If the charging interface continuously emits unusual odors such as pungent or burning smells, immediately stop charging, disconnect the power source, and report the issue to safety personnel for inspection and resolution.
6. The charging process requires full-process monitoring.
Operators must remain on duty at all times to monitor the charging status. In the event of extreme weather conditions such as typhoons, heavy rain, or hail, or any other emergency situations that could compromise safety (e.g., equipment overheating, unusual noises), charging should be immediately halted, and appropriate protective measures taken.
Attention: Violating the above instructions may result in equipment damage, fire, or personal injury. Please ensure proper usage at all times!
6 Warranty Instructions
6.1 This product comes with a two-year warranty.
6.2 The warranty service applies only to original consumers who purchased the product through the company’s official channels or authorized dealers.
6.3 From the date of purchase, during the warranty period, our company will provide coverage for any performance failures caused by defects in product materials or manufacturing processes.
Free repair or component replacement service.
6.4 From the date of purchase, during the warranty period, if product quality issues arise due to proper usage (as determined by our company's technicians), we will provide users with quality repair services.
- 6.5 The following situations are not covered under warranty; repair services will incur corresponding charges:
- Damage caused by abnormal operation, accidental incidents, misuse, negligence, or force majeure events (such as fire, flood, earthquake, or lightning strikes).
- Disassembly, repair, or modification performed by personnel not authorized by our company.
- The product serial number, anti-counterfeit label has been altered, damaged, or removed.
- Natural wear and tear caused by normal use (such as slight abrasions on the cable surface).
- Accidental damage caused by the use of non-genuine or mismatched accessories, as well as vehicle interface malfunctions.
- Scratches or fading on exterior components (such as trim strips, trademark logos).
The gun's rear section is sealed with an inspection-approved lead seal, which must not be damaged under any circumstances. If the seal is compromised, the manufacturer will no longer provide free warranty or replacement services.
7 Innovation and Advantages
7.1 Innovation
1. Innovatively adopting metering modules and local/remote communication modules, we’ve implemented a “gun-pile separation” architecture that enables separate management of metering and electrical performance, while also supporting real-time status monitoring.
2. Innovation introduces a detachable design, significantly enhancing maintainability and component replacement efficiency. It also enables the establishment of a charging gun head inventory, supporting fault-tolerant charging operations.
The gun is quickly swapped to ensure uninterrupted use of the charging station.
The above innovations can significantly enhance the efficiency of first-time verification and reduce the difficulty of metrological product testing.
7.2 Advantages
1. As legally mandated metrological instruments stipulated by the state, charging piles may in the future require type evaluation. A detachable, smart-metered charging gun can be used instead of the full charging pile for this type evaluation, thereby sparing charging-pile manufacturers from the cumbersome process of evaluating entire units. This approach helps charging-pile companies reduce both management and production costs.
2. Similarly, as charging piles are designated as legally mandated measuring instruments under national regulations, they may in the future require CMC audits. To address this, detachable smart-metered charging guns can be used instead of full charging piles for CMC audits, thereby sparing charging-pile manufacturers from the cumbersome process of conducting full-pile CMC assessments. This approach helps charging-pile companies reduce both management and production costs.
Key words:
Related Products


Welcome your message consultation
Any questions? Keep in touch. We 'd love to hear from you.